Our group had an interesting class today. We went to practical class for reanimation at Nahimovski prospekt, a building connected to our library.
First of all, we watched a video, showing us the steps doing Cardiopulmonary Resuscitation(CPR) on unconscious person in proper way. The instructions were given clearly doing on mannequin.
Here are the steps of doing CPR (Cardiopulmonary resuscitation):
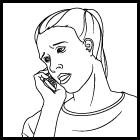
1) Call
Check the victim for consciousness. If there is no response, Call ambulance and return to the victim.
After the call, start the 3 steps, ABC (Airway, Breathing, and Circulation).
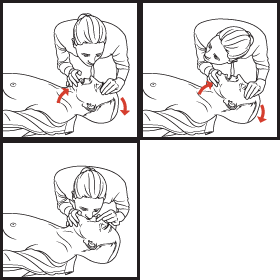
2) Airway
Extend the neck by tilting the head and lifting the chin. Clear the airway. Make sure there's nothing obstructing the airway.
3) Breathing
Assess for the presence of respiration. If no spontaneous breathing, give 2 breaths mouth-to-mouth.
4) Circulation
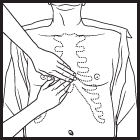
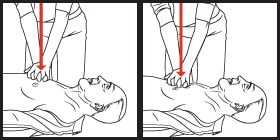
Palpate for carotid pulse by putting your index and middle fingers in the groove between trachea and muscle. If pulse is not present, deliver 30 compressions on the chest 1.5 to 2 inches right between the nipples at a rate of 100/min, faster than once per second. 30:2 ratio for all victims except newborns, 15:2.
If there are 2 rescuers present, then it is advised to alternate every 2 minutes or every 2 cycles of compression.
Remember that prior to starting CPR, it is advised to call ambulance and to get an AED (automated external defibrillator) if easily available. A rapid response is crucial as brain death starts to occur about 5 minutes after cardiac arrest if CPR and defibrillation are not provided. The chance of survival in general falls about 10% for every minute of delay in CPR.
After finished the video, we went on to simulate blood-taking from arm models, which were connected to a "blood bag" via a tube. We managed to draw "blood" if we did it correctly. It was indeed an interesting procedure, by applying tourniquet, swapping the cotton wool, and drawing "blood". However, it was quite different in doing on real patients. We couldn't hear the popping sound when we poked the vein instead of the plastic tube. Moreover, we got tension in doing on the real patient.
After that, we proceed to do CPR that we had just learned from the video on mannequins. The mannequins were attached to devices that would blink in green light if we did correctly while in red light vice versa. We tried on infant, kid, and adult mannequins respectively.
At last, we learned the procedure of doing endotracheal intubation on mannequin.
Endotracheal intubation is the placement of a tube into the trachea (windpipe) in order to maintain an open airway in patients who are unconscious or unable to breathe on their own. Oxygen, anesthetics, or other gaseous medications can be delivered through the tube.
To begin the procedure, open the patient's mouth by separating the lips and pulling on the upper jaw with the index finger. Holding a laryngoscope in the left hand, he or she inserts it into the mouth of the patient with the blade directed to the right tonsil. Once the right tonsil is reached, the laryngoscope is swept to the midline, keeping the tongue on the left to bring the epiglottis into view. The laryngoscope blade is then advanced until it reaches the angle between the base of the tongue and the epiglottis. Next, the laryngoscope is lifted upwards towards the chest and away from the nose to bring the vocal cords into view. Often an assistant has to press on the trachea to provide a direct view of the larynx. Then takes the endotracheal tube, made of flexible plastic, in the right hand and starts inserting it through the mouth opening. The tube is inserted through the cords to the point that the cuff rests just below the cords. Finally, the cuff is inflated to provide a minimal leak when the bag is squeezed. Using a stethoscope, listens for breathing sounds to ensure correct placement of the tube.
I kept inserting into oesophagus at first, because the stomach was inflated when i squeezed the ambu bag. Both of the lungs would be inflated if we placed the tube in the right place. After lots of the Kungfu stunts(called by my groupmates due to my weird posture while i was doing the intubation), i managed to do it correctly. hehehe.... All of us enjoyed doing it as we did lots of times until the teacher said it was enough and ended the class. :P
The key points given by our teacher were:
1) Do it slowly and correctly.
2) Must place the larngoscope correctly and the epiglottis must be seen.
3) Look into the mouth opening without looking away while your assistant passing you the tube.
All of us enjoyed the class today as we learned something in practical, instead of just listening to the lectures. Hope we can have more practical classes! :)
Thursday, April 2, 2009
Resuscitation!


Posted by nemo at 1:26 PM
Subscribe to:
Post Comments (Atom)


4 comments:
hmmmm the compression part that i learnt in my lifeguard course is different those days
what's the difference?
it's actually easier to intubate a real patient, as the plastic material of the mannequin is quite stiff & thus making it difficult to manoeuvre the laryngoscope blade.
ic... but still will be tension doing on a real patient. anyway, hope that i can do it well in future. :)
Post a Comment